There are a lot of options in the WordPress image detail popup and many of them are not very self-explanatory. Last week I explained how to insert images into WordPress. Today, I will list out all the options in the image detail popup and explain each one. This post would be a great reference to bookmark for next time you need to change an option but can’t remember what each one does.

To get to the image detail popup follow these steps:
- Insert an image into your post or page.
- These settings can be edited in the Insert Media popup
— OR —
- Select an image you’ve added to a post or page.
- In the action menu that pops up over the image, click on the pencil.
Image Detail Popup Sections
There are several sections in the image detail popup. I’ve grouped each option here under it’s section name to make them easy to find.
Attachment Details
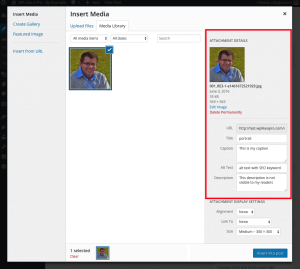
- Title – Under Image Details, the title refers to the name of the image you are uploading. The title is required by WordPress. In case you need to search for the image from the image archive, you can type the title to search for the particular image.
- Caption – This block lets you add captions to the image you are uploading. The caption will be visible below your image. Note that, the way the caption will be displayed depends on the theme that you are using.
- Alt Text – This field allows you to write a text that replaces the image when the images aren’t loading in case of a slow-loading site.
- Description – It is an optional block. This block is for you to add description to your image. If you choose for the image to be linked with an attachment page, it will be displayed on the image’s attachment page. The description is seen when the reader clicks the image in the gallery. Then the larger version of the image is seen along with the description.
Display Settings
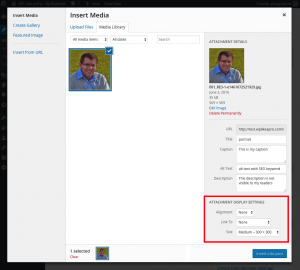
- Align – Under Image Details, this setting allows you to decide if the image should be in the content area and how it interacts with any text on your page. The image can be right aligned, left aligned, center aligned. You also have the “none” option.
- Left alignment – This option aligns the image to the left of the margin. If there is any text, it goes or flows to the right hand side of the image.
- Right alignment– This option aligns the image to the right of the margin. If there is any text, it goes or flows to the left hand side of the image.
- Center alignment– This option lets you align the image to the center and no text is displayed.
- None – This does not maintain any alignment.
- Link to – Under Image Details, this option determines where the link is leading to.
- Custom URL – This allows you to add a URL and the user will be directed to that URL when the image is clicked.
- Media File – This option links your added image directly to the original, full-sized version of the image.
- Attachment Page – This allows you to link your inserted image to its WordPress media attachment page.
- None – This option removes the link completely, and the image will be “un-clickable”.
- Size – You can resize the image and make it appear in the size that you want by customizing the length and breadth of the image. Sizes can be thumbnails, medium, large or full size.
Advanced Settings
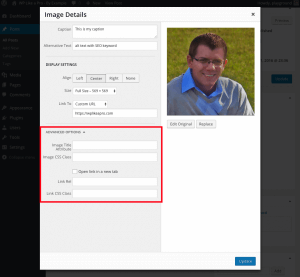
- Image Title Attribute – This block lets you write the text that will be displayed as a tooltip when a reader looks at or hovers over your image.
- Image CSS class – This advanced option lets you add CSS class to your image. Learn how to add custom CSS to WordPress like a pro!
- Open link in a new tab – This will open the image or the link where the image is leading to, in a new tab or a separate browser window.
- Link Rel – This option lets you control the Rel attribute for adding no follow. This attribute specifies the relation between the linked file and the current file.
- Link CSS Class – This advanced option lets you add a CSS class to an image link.
Conclusion
WordPress is a powerful tool but can seem really complicated and overwhelming without guides such as this to simplify things. I’m sure this is a helpful resource even for the WordPress expert who has many years of experience. Leave a comment and let me know if you’ve bookmarked this resource for later, or if I missed something. I’d like this to be an “evergreen” resource so I will be revisiting it periodically to ensure it stays up to date as WordPress changes.
Hi, been using WP for a while now. The one thing I can’t figure out is how to choose the image that comes up (from the multiple images in the post) when I share the link. It’s not the “featured image”. Help! Thanks.
Hi Stacey! I’d be happy to help answer your question. For starters, you can make sure you have the “featured image” set for the post. For additional information about this, checkout this handy article on wpbeginner.com (http://www.wpbeginner.com/beginners-guide/how-to-fix-common-image-issues-in-wordpress/#missingfeaturedimage). This link should take you right to the part about a Missing Featured Image – I know that’s not your exact problem, but the info should still guide you in the right direction! If you’ve already done that and are still having a problem, feel free to reply here or drop me a through the Contact Me page.
By the way, your blog is a very interesting family-friendly resource! Great job!
~Chris
very nice website….
Thank you, Verendder!
If I align centered the image is showing in center of the post. After I publish the image is showing in left. Why ? How to make it display in center ?
WordPress has some generated CSS rules that may be missing from, or getting overruled by, your theme. Make sure the CSS rules specified at this link are included somehow on your blog: https://codex.wordpress.org/CSS#WordPress_Generated_Classes